
I've had Nanaimo Bars on my list of recipes to make "someday". My recipe list comes in many varieties. I've bookmarked recipes that I've found on one of many favorite food blogs, or the stack of magazines with beautiful pictures and delicious sounding recipes that I've kept for years, or the recipes that I've printed out and actually filed them in my recipe binder which seems to grow daily. So when I saw this challenge, I was excited to cross this dessert off my list and complete another Daring Bakers challenge.
Before I get into the details of this challenge, let me introduce our hostess, the writer of one of my favorite blogs:
The January 2010 Daring Bakers’ challenge was hosted by Lauren of Celiac Teen. Lauren chose Gluten-Free Graham Wafers and Nanaimo Bars as the challenge for the month. The sources she based her recipe on are 101 Cookbooks and http://www.nanaimo.ca/.
I've been following Lauren's blog Celiac Teen for several months now and have gotten to know her through her wonderful and informational blog. Her posts are always a delight to read and I learn something new about baking gluten-free. She challenged us to make our own graham crackers, either gluten-free or with wheat flour (according to our preference) and then the Nanaimo Bars which incorporate the graham crackers in the bottom layer of the bars.
Lauren explains what Nanaimo Bars are:
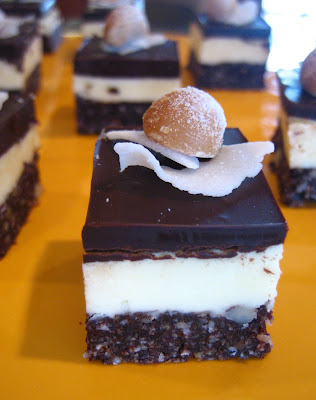
"Nanaimo Bars are a classic Canadian dessert created in none other than Nanaimo, British Colombia. In case you were wondering, it’s pronounced Nah-nye-Moh. These bars have 3 layers: a base containing graham crackers, cocoa, coconut and nuts, a middle custard layer, and a topping of chocolate. They are extremely rich and available almost everywhere across the country."
[Check out this website for more details about how Nanaimo Bars and the history.]
[Check out this website for more details about how Nanaimo Bars and the history.]
As we did have the option to make regular graham crackers, I went with what ingredients I had on hand and will share the recipe that I followed. If you would like the recipe for the gluten-free version, click here.
Although these bars are full of the ingredients that I enjoy (chocolate, nuts, coconut, etc.) the BIG SURPRISE of this challenge was the graham cracker recipe.

These graham crackers are the best I've ever had and I will never purchase the store brand graham crackers again. These were AMAZINGLY DELICIOUS!! Once you've had something so good, it's impossible to go back to an inferior product. If the challenge had stopped here, I would have been 100% satisfied with these alone. Since making them, I've been thinking about different varieties and ideas to incorporate these in other desserts--more about that in a later post.


Seriously, these pictures don't do these wonderfully tasty crackers justice. You NEED to make these and taste for yourself. They are my new favorite snack and I have to say THANK YOU Lauren for including this recipe in our challenge.

Now for the recipe. *My notes are in this color.

From 101 Cookbooks
2 1/2 cups + 2 Tbsp. all-purpose flour
1 cup dark brown sugar, lightly packed
1 tsp. baking soda
3/4 tsp. kosher salt
*1/2 tsp. cinnamon--I added this for a little extra zing and it worked well with the other ingredients.
3 1/2 oz. unsalted butter, cut into 1-inch cubes and frozen
1/3 cup mild-flavored honey, such as clover *I used an organic wildflower honey--great subtle flavor.
5 Tbsp. whole milk
2 Tbsp. pure vanilla extract
Directions:
1. In the bowl of a food processor fitted with a steel blade, combine the flours, brown sugar, baking soda, and salt. Pulse on low to incorporate. Add the butter and pulse on and off, until the mixture is the consistency of a coarse meal. If making by hand, combine aforementioned dry ingredients with a whisk, then cut in butter until you have a coarse meal. No chunks of butter should be visible.
2. In a small bowl or liquid measuring cup, whisk together the honey, milk and vanilla. Add to the flour mixture until the dough barely comes together. It will be very soft and sticky.
3. Turn the dough onto a surface well-floured with sweet rice flour and pat the dough into a rectangle about 1 inch thick. Wrap in plastic and chill until firm, about 2 hours, or overnight. *I chilled my dough for about 2 hours and after taking it out of the refrigerator, I let it sit for about 5 minutes, before rolling it out. If you keep it floured, so it doesn't stick, you won't have any problems.
4. Divide the dough in half and return one half to the refrigerator. Sift an even layer of sweet rice flour onto the work surface and roll the dough into a long rectangle, about 1/8 inch thick. The dough will be quite sticky, so flour as necessary. Cut into 4 by 4 inch squares. Gather the scraps together and set aside. Place wafers on one or two parchment-lined baking sheets. Chill until firm, about 30 to 45 minutes. Repeat with the second batch of dough. *I used Silpats and they worked great.
5. Adjust the rack to the upper and lower positions and preheat oven to 350 degrees Fahrenheit (180 degrees Celsius).
6. Gather the scraps together into a ball, chill until firm, and re-roll. Dust the surface with more sweet rice flour and roll out the dough to get a couple more wafers.
7. Prick the wafers with toothpick or fork, not all the way through, in two or more rows.
8. Bake for 25 minutes, until browned and slightly firm to the touch, rotating sheets halfway through to ensure even baking. Might take less, and the starting location of each sheet may determine its required time. The ones that started on the bottom browned faster. *I baked mine for about 18 minutes.
9. When cooled completely, place enough wafers in food processor to make 1 ¼ cups (300 mL) of crumbs. Another way to do this is to place in a large ziplock bag, force all air out and smash with a rolling pin until wafers are crumbs.
The other part of the challenge was making the Nanaimo Bars with all three layers, either following the recipe given or adapting it with our own flavor choices. Of course I immediately thought of something Hawaiian and tropical, so I adjusted the recipe to include more coconut flavoring and macadamia nuts.

Overall, I thought the bars were delicious looking, but a bit too rich for my taste. The middle layer was too sugary and sweet and if I were to make them again, I'd replace the middle layer with a higher quality filling, such as a pastry cream or custard. Also, after sampling the AWESOME graham crackers and LOVING them, I was bummed to discover that once they were made into crumbs and folded into the bottom layer, I could no longer taste them and they were really only in there for the texture. Because they were so rich, I cut them into small bite-size squares, which was plenty for one serving.

Nanaimo Bars
*Coconut-Macadamia Nut Nanaimo Bars
 For Nanaimo Bars — Bottom Layer
 For Nanaimo Bars — Middle Layer

Additional Information:

Overall, I thought the bars were delicious looking, but a bit too rich for my taste. The middle layer was too sugary and sweet and if I were to make them again, I'd replace the middle layer with a higher quality filling, such as a pastry cream or custard. Also, after sampling the AWESOME graham crackers and LOVING them, I was bummed to discover that once they were made into crumbs and folded into the bottom layer, I could no longer taste them and they were really only in there for the texture. Because they were so rich, I cut them into small bite-size squares, which was plenty for one serving.

Nanaimo Bars
*Coconut-Macadamia Nut Nanaimo Bars
Ingredients:
 For Nanaimo Bars — Bottom Layer
1/2 cup (115 g) (4 ounces) Unsalted Butter
1/4 cup (50 g) (1.8 ounces) Granulated Sugar
5 tablespoons (75 mL) Unsweetened Cocoa
1 Large Egg, Beaten1 1/4 cups (300 mL) (160 g) (5.6 ounces)
Gluten Free Graham Wafer Crumbs (See previous recipe)
1/2 cup (55 g) (1.9 ounces) Almonds (Any type, Finely chopped)
1 cup (130 g) (4.5 ounces) Coconut (Shredded, sweetened or unsweetened) *I used unsweetened coconut and roasted macadamia nuts.
 For Nanaimo Bars — Middle Layer
1/2 cup (115 g) (4 ounces) Unsalted Butter
2 tablespoons and 2 teaspoons (40 mL) Heavy Cream
2 tablespoons (30 mL) Vanilla Custard Powder (Such as Bird’s. Vanilla pudding mix may be substituted.)
2 cups (254 g) (8.9 ounces) Icing Sugar
*pinch of salt
*coconut extract

For Nanaimo Bars — Top Layer
4 ounces (115 g) Semi-sweet chocolate
2 tablespoons (28 g) (1 ounce) Unsalted Butter
Directions:
1. For bottom Layer: Melt unsalted butter, sugar and cocoa in top of a double boiler. Add egg and stir to cook and thicken. Remove from heat. Stir in crumbs, nuts and coconut. Press firmly into an ungreased 8 by 8 inch pan.
2. For Middle Layer: Cream butter, cream, custard powder, and icing sugar together well. Beat until light in colour. Spread over bottom layer.
3. For Top Layer: Melt chocolate and unsalted butter over low heat. Cool. Once cool, pour over middle layer and chill.
Additional Information:
These bars freeze very well, so don’t be afraid to pop some into the freezer.
Thanks again Lauren, for a fun challenge and be sure to visit the other Daring Bakers' blogs for more creative ideas.

Thanks again Lauren, for a fun challenge and be sure to visit the other Daring Bakers' blogs for more creative ideas.


