The Lemon Cucumber

Let me introduce you to a lesser-known cucumber, but an oh-so-tasty one: The Lemon Cucumber.

We've planted cucumbers in our garden each year since I was a kid and my Mom has always made fresh pickled cucumbers every summer for our family. Over the last several years we've planted a heirloom cucumber variety called Lemon Cucumbers. These cucumbers are round and are about the size of a baseball. Despite the name, Lemon Cucumbers don't taste like lemons, but can take on a yellow coloring that is similar to the yellow of a lemon. As you can see from the picture, there is a slight yellow hue, but to me they are more of a light green. Also, they taste very much like other cucumber varieties, and for a bonus, they are crunchier, which I love and they taste delicious, especially when pickled.


Today when my Mom came in with a dozen of them, just picked from the garden--I knew she was going to make them into the homemade pickles--so yummy! If you want to make something that is cool and refreshing and only takes about 10 minutes of prep time and then an hour till it's ready, then this recipe is the one for you.

Quick & Easy Cucumber Pickles

Lemon Cucumbers (or any variety of your favorite cucumber)
Walla Walla Onions (these are a milder onion with a sweeter flavor, but yellow onions will also work)
2 parts vinegar
1 part water

1) Peel and slice cucumbers.


2) Peel and thinly slice onion (keep them in a circle shape, not chopped).

3) Put cucumber-onion mixture into bowl or jar (large enough that the vegetables are immersed when liquids are added).

4) Add vinegar and water (adjust to taste; if it's too sharp, add more water).

5) Cover bowl/jar and refrigerate at least 1 hour, before serving.

*Eat as a snack, with a meal or add to your favorite summer garden salad.


Daring Bakers: Milan Cookies


Last week was a fun filled week consisting of a trip to the coast, shopping, catching up with my three best friends from my childhood (two of them stayed with me and we had so much fun staying up late), and two days of our 20th high school reunion events. Oh, and did I mention also filling dessert orders, including making desserts for the reunion? It was a busy week and before I knew it, the 27th arrived and well, here we are--the reveal day for this month's challenge.

The July Daring Bakers' challenge was hosted by Nicole at Sweet Tooth. She chose Chocolate Covered Marshmallow Cookies and Milan Cookies from pastry chef Gale Gand of the Food Network.

This month we had the option to make one or both of the recipes, and due to the lack of extra time I had this month, I choose to make the Milan Cookies, which seemed to be the quickest one. Also, I've made marshmallows before and I wanted to try something I haven't made before. These cookies were so quick and easy that if you ever have a last minute event to attend and need to bring something delicious, this is the recipe for you! (I know this from actual experience, since I just made these cookies an hour ago and it took less than 45 minutes from start to finish).

If you love Mallows (marshmallow chocolate covered cookies) I've included the link for that recipe as well.

*I've added notes or helpful hints in orange.

Milan Cookies
Recipe courtesy Gale Gand, from Food Network website
Prep Time: 20 min
Inactive Prep Time: 0 min
Cook Time: 1 hr 0 min
Serves: about 3 dozen cookies

Cookie Batter
12 tablespoons (170grams/ 6 oz) unsalted butter, softened
2 1/2 cups (312.5 grams/ 11.02 oz) powdered sugar
7/8 cup egg whites (from about 6 eggs)
2 tablespoons vanilla extract
2 tablespoons lemon extract
1 1/2 cups (187.5grams/ 6.61 oz) all purpose flour
Cookie filling (recipe follows)

Chocolate Filling
1/2 cup heavy cream
8 ounces semisweet chocolate, chopped *I used bittersweet chocolate which is a darker than a semisweet chocolate.
1 orange, zested *I used an orange oil, in place of orange zest.

1. In a mixer with paddle attachment cream the butter and the sugar.
2. Add the egg whites gradually and then mix in the vanilla and lemon extracts.
3. Add the flour and mix until just well mixed.
4. With a small (1/4-inch) plain tip, pipe 1-inch sections of batter onto a parchment-lined sheet pan, spacing them 2 inches apart as they spread. *I used Silpats, which worked great.
5. Bake in a preheated 350 degree oven for 10 minutes or until light golden brown around the edges. Let cool on the pan.
6. While waiting for the cookies to cool, in a small saucepan over medium flame, scald cream.
7. Pour hot cream over chocolate in a bowl, whisk to melt chocolate, add zest and blend well.
8. Set aside to cool (the mixture will thicken as it cools).
9. Spread a thin amount of the filling onto the flat side of a cookie while the filling is still soft and press the flat side of a second cookie on top.
10. Repeat with the remainder of the cookies.

*I piped different sizes and shapes (oblong, oval, medium rounds, small rounds, etc.--all shapes tasted delicious!)


Stay Tuned...

Yep, it's Monday.

It's been a nice busy day off from work. In fact, I have been enjoying today's mini-vacation so much that I've decided to postpone the Monday Must Have till tomorrow. For now just sit back and enjoy the view from the Jillicious backyard.

I'll be back to business tomorrow...or next week, as it turns out.

Lavender Inspired Cupcakes


I like experimenting with cupcake flavors.

The flavor combinations are endless--so many possibilities! Cupcakes are quick and easy to make, you don't have to feel guilty by eating an entire cupcake in one sitting (see you can't say that about eating an entire cake) and with the right recipe they are oh-so-tasty!

Ideas or inspiration can come from different sources. Today it was the direct approach when my Mom made the comment "You should make lavender cupcakes," because I had some extra lavender-colored buttercream from a Birthday Gift Cake I had made for a client earlier today.


And as it just so happens, we grow lavender in several varieties, including English Lavender, which is the best one for baking (aka Culinary Lavender).


After doing some quick research online and reading about the different ways you can incorporate the lavender, I decided to use the lavender we had gathered in bunches and hung from a rod to dry out (we have this in a very small closet-like space which stays warm and is perfect for drying out flowers and herbs).


Next, I used a small coffee grinder that I use solely for grinding herbs and spices and it worked perfectly. I wanted the lavender seeds to be small, but not too small that it turned to a powder. I made my favorite white cake recipe, adding some lemon zest, lemon juice and towards the end of mixing, I added the ground lavender. I also tinted the batter a pale lavender color.


As I mentioned before, I had a White Chocolate-Vanilla Buttercream to frost the cupcakes with and I added some freshly cut lavender for decoration. Ta da!


*Although I love the smell of lavender, when it comes to incorporating it in my food, I tend to appreciate just a hint of lavender flavor, rather than it being the main focus. I added about 1 Tbsp. of the ground lavender for 1 dozen cupcakes, and for me, it was perfect. If you like a stronger flavor, I would maybe double or triple that amount.

Monday Must Have: Home Grown Food


During the summer our family loves to eat most meals straight from the garden and right now the lettuce is plentiful and the zucchini is just coming into season. Because of this, we tend to eat many salads and it's always good to have different types to choose from, so we don't get sick of eating the same thing.

Last week we had some friends visit from out-of-town and because we were having such a great time, we had them stay for lunch and this was the perfect meal to make, as it is so quick and easy.

My Mom created this DELICIOUS summer salad, which I will call "Mamma-Jo's Summer Salad" (Mamma-Jo is a nick name that really has nothing to do with her real name, but years ago my sister and I started calling her that and it just stuck).

Mamma-Jo's Summer Salad
*Yields: 1 very large salad, enough to feed 7-10 people & enough for seconds too.

2-3 varieties of lettuce (we like Red Romaine, Green Romaine & Curly Leaf)
1 or 2 small zucchini's sliced
2-3 small tomatoes (Heirloom, Roma, or whatever kind you have in your garden)
1 can red kidney beans, drained & rinsed
1 can white kidney beans, drained & rinsed
1 can black beans, drained & rinsed
1 can garbanzo beans, drained & rinsed
2 Tbsp. minced onion (dried)
1 small can sliced black or green olives
1 avocado
sunflower seeds
1 pkg. lean ground beef, cooked with your choice of spices (we like minced onion, salt, pepper and lemon seasoning)

Directions:

1) Mix all four types of beans with minced onions, cut up tomatoes & zucchini.
2) Add cut up lettuce and toss with bean mixture.
3) Have ground beef, sliced avocado, sliced olives and sunflower seeds set aside in separate bowls (in case there is leftover salad, then these ingredients won't brown or make the salad soggy).
4) Build your salad and use your choice of dressing.
5) Eat, enjoy, repeat.


I wish I had a picture of the finished salad, but we started eating before I even thought about it. But you'll just have to trust me when I say that we all enjoyed this salad and went back for more. When you use fresh ingredients, especially produce from your own garden, you'll never be disappointed.

How I Spent My Vacation

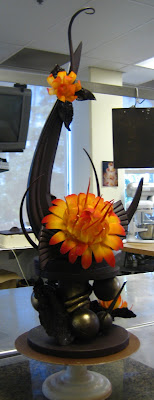
During the last week in June I took some time off, closed down Jillicious Desserts for a week and drove down to California. It was time to have a little vacation, relax, visit friends and of course do some shopping. One of the highlights of my trip was visiting my mentor and friend Chef Doug, who I met right before graduating from culinary school. I had planned to visit him at the Professional Culinary Institute, where he currently teaches in the baking & pastry program, one of the days I was in town. One day turned into four fabulous days of my week long vacation. It was the best part of being back in the bay area.


Although I love having my own business and having the opportunity to create my own desserts, sometimes I miss being around other people in this industry. People that I know, admire and continue to learn from--which is why it was so great to be back in a learning environment. The great thing about the culinary industry is that you never stop learning about the trade. There is ALWAYS a skill you can practice, improve, cultivate, create, learn more about and then it translates into becoming a better chef, and having endless possibilities of imaginative creations that you discover over time. And if you are lucky, you have people in your life that inspire you to do better, push yourself further and at times, you can just simply enjoy being a part of the creative process. This was one of those times for me.


Over the several days I spent at the P.C.I., I did just that--I worked, learned, shared and was focused on the joy of creating. I visited at the perfect time; the students were getting prepared for their final projects and Chef Doug had taken some extra time to show them how to create a chocolate showpiece and the different techniques you can use in chocolate work. I have to admit that I get so engrossed during these times, that I forget to take pictures of each part of the process. But here are a few that I managed to take:


Let me introduce my good friend Chef Doug. He's working on the part of the chocolate that was poured into a shape and while it was almost set up, the abstract shape is carved and given more character.


There were many other steps before this one, but as I said before, I was too busy just enjoying watching and helping with the other chocolate components. After the main structure was built, a layer of chocolate and cocoa butter were sprayed to give the sculpture an even look and some gold accents were also added.

Most of this showpiece was made up of dark chocolate, but the flowers were made out of white chocolate and then later sprayed with color. This large flower was made up of several components and was very delicate.

After the flower was assembled, it was sprayed with a cocoa butter color and then it was ready to be added to the main sculpture.

Attaching this flower was the most difficult, as the petals were very fragile and the heat of your hands can melt the white chocolate pretty quick if handled incorrectly. But as you can see, it turned out beautifully and added an interesting dimension to the showpiece.

A closer look to one of the small flowers on the base of the sculpture (one of the flowers I helped to make--yes, it was so exciting!)

A side view of the completed Chocolate Showpiece.

Beautiful.

Amazing.

Graceful.

Inspiring.

Chef Doug--Thanks for everything you shared with me.

Monday Must Have: Silpats


It's been too long since I've posted a "Monday Must Have." I have been out of town the past two Mondays and didn't have access to a computer and I wasn't organized enough to schedule those posts to well, post using the blogger scheduler. But enough of my excuses--let's move on with another favorite of my kitchen "must haves"--the Silpat.

This past weekend, I made fresh fruit tarts for Farmer's Market and the tart shells baked up perfectly and evenly on the Silpat. I also used them when I applied the apricot glaze (which can be sticky) and if I spilled on it, no problem--very easy to clean. (The picture above was taken before I applied the glaze).

I use my silpats every time I bake cookies, tarts, pies, galettes, french macarons and anything else that requires a sheet pan. They have saved much time from scrubbing pans that have had a juicy pie spill over with a sugary mess (you know what I'm talking about) the kind that leaks out onto the bottom of your oven and leaves a blackened mess that is a pain to clean up. Yes, you can use parchment paper or even wax paper in place of the silpat, but ever since my very first experience using them--I haven't gone back.

Here's three tips in taking care of your Silpat:

1) Wash in warm, soapy water by hand (don't put them in the dishwasher, in case they slide down on the bottom and get stuck on the heat element--that could ruin it).

*Also, I like to wash them as soon as I'm done baking with them, put them on a sheet pan and stick them in the oven that is still warm from baking. They dry out great and you don't have to have them take up valuable counter space waiting for them to dry. Just remember to remove the pan & Silpat from the oven before your next baking experience.

2) Never cut your baked good while still on the Silpat. Once slice from a sharp knife will cut through it and it can't be fixed.

3) Store them flat. I place them on the sheet pans and put them away in a drawer for my pans.